

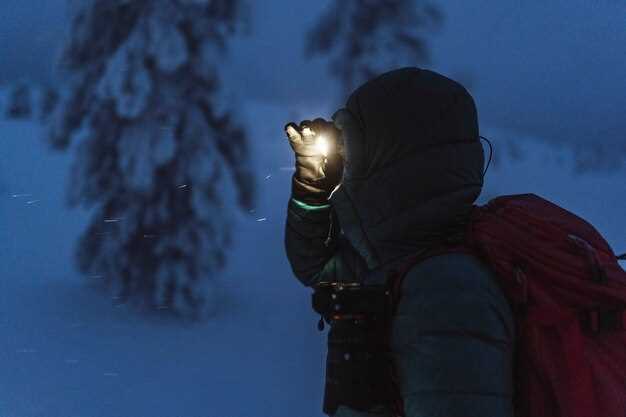
Embarking on a night hike can be one of the most exhilarating experiences for outdoor enthusiasts. However, it requires careful preparation and the right equipment to navigate safely and efficiently after sunset. Among the essential tools for nighttime exploration, night vision gear stands out as a crucial asset that transforms the hiking experience by enhancing visibility and helping adventurers see in the dark.
When considering a night hike, understanding the functionality of night vision devices is key. These tools are designed to amplify available light, providing a clear view of the surroundings even in low-light conditions. By taking the time to familiarize yourself with the various types of night vision gear, including goggles and scopes, you can maximize your safety and enjoyment under the stars.
In this article, we will delve into the essential aspects of preparing for a night hike, focusing on the various options in night vision technology. We will discuss the benefits of using night vision, provide tips on how to select the best gear for your needs, and outline important safety considerations that will help you make the most of your nighttime adventures.
Choosing the Right Night Vision Equipment for Your Needs
When preparing for night hikes, selecting the appropriate night vision equipment is crucial for safety and enjoyment. The first step is to determine the type of vision technology that best suits your needs. There are primarily three types of night vision: image intensification, digital night vision, and thermal imaging. Each has its own set of advantages and limitations that affect usability during hiking.
Image intensification devices amplify existing light, allowing you to see in low-light conditions. They are ideal for observing wildlife and navigating trails without drawing attention. However, they require some ambient light and may not work effectively in total darkness. On the other hand, digital night vision utilizes electronic sensors to create a visible image, making it versatile in both low-light and total darkness. This type of gear often has built-in recording capabilities, which can enhance your hiking memories.
Thermal imaging, while generally more expensive, detects heat signatures and allows you to see in complete darkness. This equipment is particularly beneficial for identifying animal movement or finding heat leaks in gear, but it lacks the detail and color differentiation provided by image intensification or digital devices.
Consider the weight and portability of the equipment as well. While binoculars or monoculars are excellent for long-distance viewing, a lightweight headset may be preferable for hands-free navigation on rugged trails. Check battery life as well; extended hikes may require extra power sources or rechargeable equipment to ensure that your vision tools remain functional throughout your adventure.
Furthermore, assess the unit’s durability and weather resistance, especially if you plan to hike in varying conditions. Look for equipment that can withstand moisture and impact to avoid malfunction in challenging environments.
The clarity of the optics is another critical factor. A higher resolution will provide a clearer image, helping you identify obstacles and navigate effectively during your hike. Test different models to find the optimal balance of features that aligns with your hiking style and preferences.
In conclusion, selecting the right night vision equipment involves understanding your specific needs regarding vision technology, portability, durability, and optical clarity. By carefully evaluating these factors, you can enhance your night hiking experience, ensuring both safety and enjoyment under the stars.
Understanding Different Types of Night Vision Technology
Night vision technology has revolutionized the way we explore and experience the outdoors after dark. This technology primarily falls into three categories: image intensification, thermal imaging, and digital night vision.
Image Intensification is the most common type of night vision. It works by collecting ambient light, such as moonlight or starlight, and amplifying it to produce a bright, clear image. This technology converts light photons into electrons, which are then amplified and converted back into visible light. Night vision devices that use image intensification typically come in generations, with newer generations offering improved resolution and performance in low-light conditions. Gen 1 devices provide basic capabilities, while Gen 2 and Gen 3 offer enhanced clarity and sensitivity, making them suitable for both recreational and tactical uses.
Thermal Imaging operates differently by detecting heat emitted from objects rather than light. This technology creates an image based on the temperature variations in the environment, allowing users to see in complete darkness, regardless of the light conditions. Thermal cameras identify warm objects, such as animals or humans, against cooler backgrounds, making them particularly valuable for search and rescue operations, wildlife observation, and security applications.
Digital Night Vision combines elements of both image intensification and thermal imaging, utilizing electronic sensors to capture low-light scenes and convert them into digital images. This technology often features video recording capabilities and the ability to display images in color, enhancing the viewing experience. Digital night vision devices can function in various lighting conditions, including complete darkness and bright light, making them versatile for different environments.
Understanding these different types of night vision technology is crucial when preparing for night hikes. Each type has its unique advantages and potential applications, so choosing the right equipment depends on specific needs and conditions you may encounter during your excursions.
Safety Precautions for Night Hiking with Night Vision Gear
When engaging in night hiking equipped with night vision gear, it is essential to follow specific safety precautions to ensure a safe and enjoyable experience. Night vision devices enhance visibility in low-light conditions; however, they do not eliminate the need for caution.
Firstly, always hike with a companion. Solo hiking at night can increase risks, such as encountering wildlife or navigation errors. A partner provides assistance in case of emergencies and boosts overall safety.
Familiarize yourself with the trail during daylight hours. Understanding the terrain helps in avoiding potential hazards like steep drops, obstacles, or water bodies that could pose dangers when visibility is limited.
Stay within your comfort zone regarding hiking experience and fitness level. Night hiking can be more challenging than daytime excursions, so consider your physical preparedness and choose a suitable trail.
Use your night vision gear responsibly. Adjust the settings based on the environmental conditions, and avoid looking directly at bright lights, as this can hinder your vision adaptation.
Carry a backup light source, such as a flashlight or headlamp, as night vision equipment may sometimes fail or require battery replacement. A standard light can also help illuminate areas where night vision gear might not be effective.
Practice navigation skills using a map and compass, even when using night vision devices. Technology can sometimes fail, and being able to navigate manually is a vital skill.
Dress appropriately for the weather and wear sturdy footwear to prevent slips and falls. Warm, layered clothing is advisable, as temperatures can drop significantly at night.
Finally, be mindful of wildlife activity, which can increase at night. Make noise to alert animals of your presence, and maintain a respectful distance from any wildlife encountered on the trail.
Planning Your Route: Considerations for Night Visibility
When preparing for night hikes, careful planning of your route is essential to ensure an enjoyable and safe experience. The unique challenges posed by limited visibility require specific considerations.
- Familiarity with the Terrain: Choose a route you are already familiar with. Recognizing landmarks and obstacles in advance will help mitigate surprises in low-light conditions.
- Trail Conditions: Assess the condition of the trail. Rocky, uneven, or overgrown paths can pose greater hazards at night. Opt for well-maintained and clearly marked trails when possible.
- Length and Duration: Select a trail that matches your fitness level and consider how long you plan to hike. Night hikes can feel longer, so aim for shorter routes to avoid fatigue.
- Visibility Factors: Consider natural light sources such as the moon phase or nearby artificial lights. A bright moon can enhance your night vision, while complete darkness may require reliance on night vision gear.
- Safety Points: Identify safe places along your chosen route where you can rest or seek shelter if needed. Mark these locations on your map in advance.
- Wildlife Considerations: Be aware of the local wildlife, particularly nocturnal animals. Researching the area will help you understand any potential encounters.
By taking these considerations into account, you can enhance your hiking experience while optimizing your night vision gear for a successful adventure.
Adjusting Your Hiking Techniques for Low-Light Conditions
Hiking in low-light conditions requires a shift in technique to ensure safety and efficiency. One of the primary adjustments is to maintain a steady and deliberate pace. In dim lighting, it’s essential to move slowly to allow for accurate vision assessment of the terrain and to avoid potential tripping hazards. Navigating uneven ground becomes more challenging when visibility is limited, so focusing on each step is crucial.
Utilizing night vision gear can enhance your ability to perceive your surroundings. Before setting out, familiarize yourself with the equipment and its capabilities. This preparation helps you understand how to best utilize the enhanced vision it provides, reducing the chance of disorientation and increasing confidence on the trail.
Additionally, adjusting your gaze techniques is vital. Instead of fixating directly on obstacles, practice looking slightly ahead to anticipate and prepare for changes in terrain. This forward-looking approach allows your peripheral vision to pick up on movement and changes more effectively, providing a broader understanding of the hiking environment.
It’s also important to use your senses beyond vision. Enhance your auditory awareness as sounds can provide context to your surroundings. Listening closely can alert you to wildlife or changes in the environment that may not be immediately visible.
Finally, ensure that you are hiking with a group or partner, as this not only provides emotional support but also allows for shared vigilance. Communicating your observations will help reinforce safety and awareness as you navigate through the darkness, making for a safer and more enjoyable hiking experience.
Maintaining and Caring for Your Night Vision Equipment

Proper maintenance of your night vision equipment is crucial for ensuring optimal performance and longevity. By adhering to specific care guidelines, you can preserve your gear’s vision capability and reliability during night hikes.
Here are the key steps to maintain and care for your night vision devices:
| Maintenance Task | Description |
|---|---|
| Cleaning Lenses | Use a microfiber cloth to gently wipe the lenses. Avoid abrasive materials that could scratch the surface. |
| Storage | Store equipment in a cool, dry place. Use protective cases to prevent dust and scratches. |
| Battery Care | Remove batteries when not in use for extended periods. Use high-quality batteries to avoid leakage. |
| Regular Inspections | Periodically check for any signs of damage or malfunction. Address issues promptly to prevent further complications. |
| Temperature Regulation | Avoid exposing equipment to extreme temperatures. Sudden temperature changes can affect performance. |
Following these practices will help maintain the functionality of your night vision equipment, ensuring that you have a clear vision during your nighttime adventures.
